Integrating Ironclad Clickwrap with your web content management system
Instead of using Ironclad Clickwrap's out of the box Legal Center, you can also choose to integrate Ironclad Clickwrap into your own content management system such as Wordpress, HubSpot, or other systems using a combination of Webhooks and Ironclad Clickwrap's REST API. You could also use a platform like Zapier, Cloud Elements, or MuleSoft to integrate in as well. We're going to provide an example of integrating to Wordpress for this example.
What is covered in this doc
-
Setting up a Webhook to notify your CMS when a new version of a contract template is published in Ironclad Clickwrap
-
Setting up an integration to catch Ironclad Clickwrap's webhook and make a REST API call to Ironclad Clickwrap to get information about the version published using the Version ID
-
Making an API call to your CMS (Wordpress for this example) using the metadata from the version of the contract template that was published in Ironclad Clickwrap
-
Publishing the updated contract template version on the Wordpress site
What you need for this doc
To successfully test this out in your own environment, you'll need the following:
-
A current version of Wordpress in a publicly facing environment with the REST API accessible
-
An Ironclad Clickwrap account with REST API access and Webhooks enabled
-
Basic knowledge of publishing contract templates in Ironclad Clickwrap. Learn more here >
1. Setting up a Webhook to notify your CMS
Ironclad Clickwrap offers Webhooks (more on that here) that you can set up to notify any third party system or app of key events happening in Ironclad Clickwrap. When using your own CMS to host your legal content, you'll want to focus on the "Version Published" Webhook, which we'll set up in this section.
Why? Any time a new version of a public contract is published, you'll want to update your website/CMS to grab the latest version from Ironclad Clickwrap. That way your legal team can be autonomous and manage their own updates without needing to submit a ticket with marketing, product, or engineering.
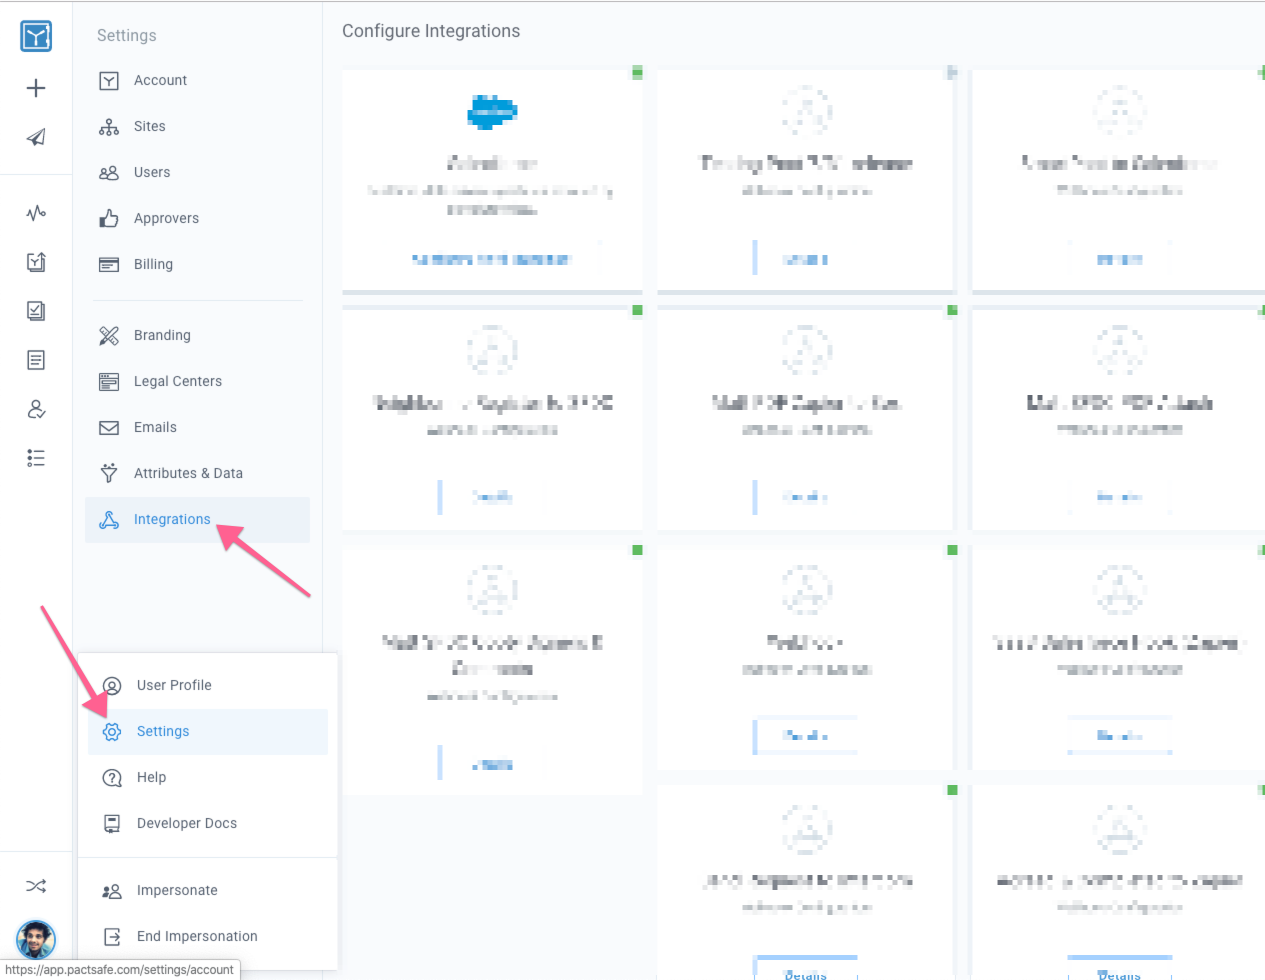
To set up a Webhook in Ironclad Clickwrap, head to your Settings and click "Integrations":

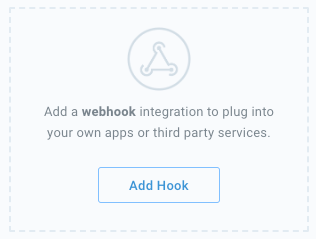
Then click to add a Webhook that we'll set up to notify the CMS when a new version of a contract is published:

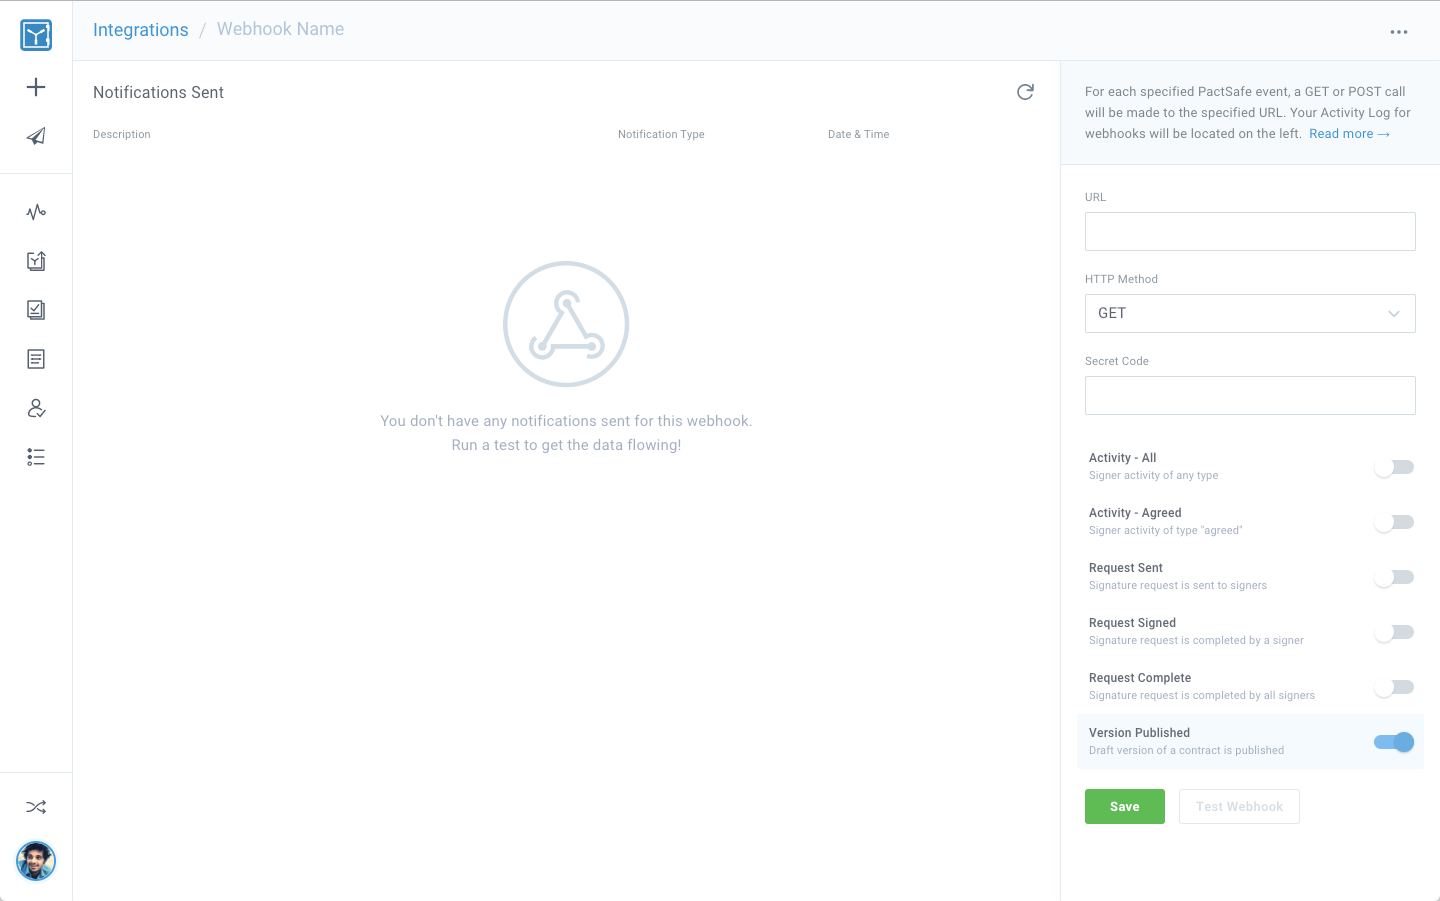
You'll be taken to a Webhook configuration screen where you can define:
- the URL you'd like to notify when a version is published
- whether the Webhook notification should be an HTTP
GETorPOST - if you'd like to include a secret code in the HTTP headers (more on that here) — the header is "Clickwrap-Webhook-Token"

Notice the "Version Published" Webhook is enabled. Once your URL and HTTP method are configured, click "Save".
Finalize setting up your webhook
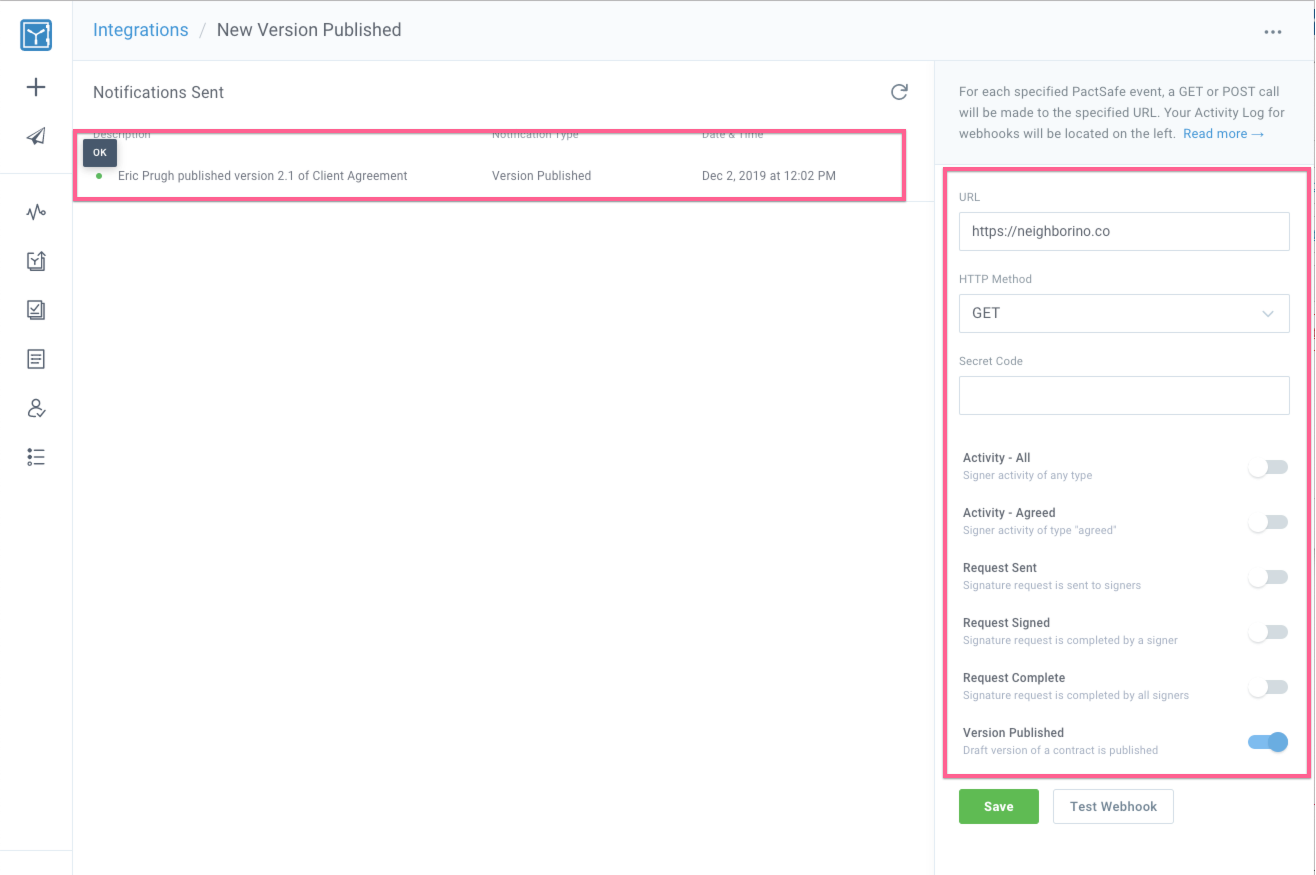
After you've entered your URL for testing, you can see the Webhook in action by:
- Going to your contracts,
- Publishing a new version of a public contract, and
- Heading back to your Integrations page and clicking "Details" to view the logs of notifications sent
Your notifications will show GREEN if they were successful and RED if we received an error. Note: We do have a retry policy for Webhook notifications that fail.

The following metadata will be passed in the body of the request when we notify the URL you set up:
{
   "type":"webhook",
   "integration":"596f854922d3a615b6dce9f7",
   "sent_to":"https://[YOUR ENDPOINT ID].x.requestbin.com",
   "event_type":"version_published",
   "description":"Jim Smith published version 3.0 of \"E-Waiver Form\"",
   "site":2,
   "version":"596ce71022d3a615b6d94345",
   "contract":11602,
   "user":45,
   "updated_time":"2017-07-19T16:14:57.090Z",
   "created_time":"2017-07-19T16:14:57.088Z",
   "deliverable":true,
   "id":"596f858184281715b3493651"
}
From there, you'll want your integration or code to grab the details of the version using the Ironclad Clickwrap REST API which we'll cover next!
2. Setting up an integration to catch Ironclad Clickwrap's webhook and make a REST API call to Ironclad Clickwrap
Once your Webhook is setup, you'll want to create the integration to "subscribe" or listen for notifications being sent from Ironclad Clickwrap. When a notification is sent, your code or integration will need to:
- Grab the contract body & metadata via the REST API from Ironclad Clickwrap
- Use the response, including the escaped HTML body, to publish it to your CMS
Our REST API requires an OAuth 2.0 access tokenTo learn how to generate an Access Token, check out this doc to learn more. You'll need admin access to Ironclad Clickwrap with REST API enabled.
With the Webhook sent when the contract version is published, you'll receive a Version ID that you can then use to query the REST API. In the Webhook request body you see above, there's a version property you'll use:
{
   ...
   "version":"596ce71022d3a615b6d94345",
   ...
}
Your integration can take that version and do an HTTP GET to https://api.pactsafe.com/v1.1/versions/:version_id?expand=contract. _Why do ?expand=contract? That will give you back additional metadata like tags. Here's an example response here:
{
  "data": {
    "minor_version_number": 0,
    "is_major_version": true,
    "published": true,
    "published_time": "2019-12-02T19:34:02.691Z",
    "effective_time": "2019-12-02T19:34:02.691Z",
    "deprecated_time": null,
    "body": "<div style="... HTML BODY GOES HERE",
    "protected": false,
    "type": "html",
    "dynamic": false,
    "status": "published",
    "change_summary": "",
    "notify_signers": false,
    "tokens": [],
    "title": "Terms of Sale",
    "created_by": 320,
    "updated_by": 320,
    "account": 102,
    "site": 186,
    "contract": {
      "deleted": false,
      "published": true,
      "published_time": "2019-12-02T19:34:02.691Z",
      "protected": false,
      "private": false,
      "public": true,
      "shared": false,
      "classification": "unclassified",
      "type": "html",
      "tags": [ "English", "en-us" ],
      "key": "terms-of-sale",
      "title": "Terms of Sale",
      "created_by": 320,
      "updated_by": 320,
      "account": 102,
      "site": 186,
      "created_time": "2019-12-02T19:33:03.122Z",
      "updated_time": "2019-12-02T19:34:57.999Z",
      "download_endpoint": "s/dff5f504-d0bf-4003-9662-a90a26305f01/contracts/1532.pdf",
      "latest_version": "5de566ef8b4c070f97812976",
      "published_by": 320,
      "published_version": "5de566ef8b4c070f97812976",
      "id": 1532
    },
    "version_number": 1,
    "created_time": "2019-12-02T19:33:03.146Z",
    "updated_time": "2019-12-02T19:34:02.693Z",
    "fields": [],
    "download_endpoint": "s/dff5f504-d0bf-4003-9662-a90a26305f01/versions/5de566ef8b4c070f97812976.pdf",
    "editor_version": "2_0",
    "full_version_number": "1.0",
    "major_version": null,
    "published_by": 320,
    "thumbnail_location": "s/dff5f504-d0bf-4003-9662-a90a26305f01/thumbnails/documents/1532/versions/5de566ef8b4c070f97812976/preview.png",
    "id": "5de566ef8b4c070f97812976"
  }
}
For the sake of this example, we have mapped the key of the contract to the slug in our web CMS. That way, when we update the content, we can easily map pages from Ironclad Clickwrap's Legal CMS to Wordpress.
Headers for Ironclad Clickwrap's REST APIsYou'll also pass in an Authorization Header with your
GETcall, so make sure to read up on how to do that here.
This response should give you everything you need to forward on and send the name, tags, version number, and HTML body to your web CMS.
3. Making an API call and publishing to your CMS
Lastly, you'll set up an API call or integration for your CMS to take the HTML body and metadata from your contract and publish it to your CMS. Here's an example of Wordpress' API documentation for pages, which we'll be using for this example.
By making a POST call to https://yourwpsite.com/wp/v2/pages/<id>, you can take the HTML body and update it with the content property in Wordpress.
Map page slugs to Ironclad Clickwrap's "contract key"The contract "key" in Ironclad Clickwrap is a customizable slug you can apply to your contract. We automatically generate one, but you can go into your contract properties by clicking into a contract here and clicking the pencil next to "Key" in the top right.
The JSON body of the GET call to https://yourwpsite.com/wp/v2/pages/<id> would look as follows:
{
  "content": {
      "rendered": "<h1><a id=\"_3jr4id5503z\"></a><strong>Free Trial Offer Terms and Conditions</strong></h1>\n<p>Effective as of August 22, 2019</p>\n<p>...",
      "protected": false
  }
}
Questions? Give us a shout by emailing [email protected].
