Adding a Signature to an Embedded Contract
How to add a stylized signature or initials block into a document itself
Overview
While a checkbox or click is often enough to constitute a legally binding acceptance in most jurisdictions, there are occasions when a stylized signature or initials block on the document itself is the preferred method of acceptance. Keep reading to find out how to configure your HTML contracts to include this acceptance method.
Requirements
To get started, you'll need to ensure that you have the following:
- Ironclad Clickwrap Site Access ID. More info in the Authentication page.
Configuring a Contract
Using the New Experience
- Login to the app at clickwrap.pactsafe.com.
- On the templates tab, create a new HTML template or edit an existing one. In either case, you should be redirected to <https://clickwrap.pactsafe.com/templates/:id/edit>
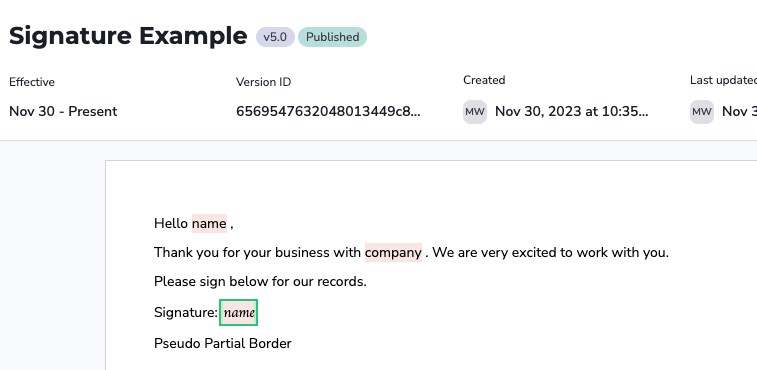
- Using the WYSIWYG editor, enter in the following example text:
Hello {{name}},
Thank you for your business with {{company}}. We are very excited to work with you.
Please sign below for our records.
Signature: {{name}}
- Next from the
...overflow menu, select the "Toggle Code View" option. - Where previously we had the second
{{name}}block, replace that line with
<div>Signature: <span style="font-family:cursive">{{name}}<span></div>- Set the contract to
publicif it is not already (so that it can be loaded into an Embedded Contract Group) and publish the Template. - Note the Template Key from the sidebar, as we will use it in the next step. For demo purposes, ours is named
signature-example.
Example Advanced styles:
<span style="font-family: 'Lucida Handwriting', cursive;padding: 0 2px; background-color: #c4f4c4;outline: #00ca88 solid 2px;">Example Template Preview (in Ironclad Clickwrap)

Add Template to a Clickwrap Group
- Configure a
scrollstyle Clickwrap Group (Create a Clickwrap Group). - Add the Template from above (
signature-example) to this group. - Give the Embedded Group a useful Key. For demo purposes, ours is named
signature-group. - For this demo, on the "Embed" tab, set the "HTML Element ID" to
agreementsand click "Publish".
Testing the signature block
- For the ease of testing here, go ahead and use this example to setup your page.
<html>
<head>
<meta charset="UTF-8">
<link rel="stylesheet" type="text/css" href="https://cdnjs.cloudflare.com/ajax/libs/skeleton/2.0.4/skeleton.min.css">

<script>
  // Note: this points to production! If you are testing on a demo Site, update this url to vault.demo.pactsafe.io
  (function(w,d,s,c,n,a,b){w['PactSafeObject']=n;w[n]=w[n]||function(){(w[n].q=w[n].q||[]).push(arguments)}, w[n].on=function(){(w[n].e=w[n].e||[]).push(arguments)},w[n].once=function(){(w[n].eo=w[n].eo||[]).push(arguments)},w[n].off=function(){(w[n].o=w[n].o||[]).push(arguments)},w[n].t=1*new Date(); a=d.createElement(s),b=d.getElementsByTagName(s)[0];a.async=1;a.src=c;b.parentNode.insertBefore(a,b) })(window,document,'script','//vault.pactsafe.io/ps.min.js','_ps');

  _ps('create', '<Your Clickwrap Site Access ID>');
  _ps('set', 'signer_id', '<Your Signer ID>');

  var renderData = {
    company: '<Your Company Name>',
    name: ''
  };
  _ps('set', 'dynamic', true);
  _ps('set', 'render_data', renderData);

  var groupKey = 'signature-group';
  _ps('load', groupKey);
  _ps.on('rendered', function(){
    document.getElementById('name-input').addEventListener('change', function(evt) {
      renderData.name = evt.target.value;
      _ps(groupKey + ":retrieveHTML", renderData);
    });
  });
</script>
</head>
<body>
  <div class="container">
    <div class="row">
      <div class="twelve columns">
        <h1>Signature Example</h1>
        <div>
          <label for="name">Name</label>
          <input type="text" name="name" id="name-input" />
        </div>
        <div id="agreements"></div>
      </div>
    </div>
  </div>
</body>
</html>
- Save the file as
signature.html.
Testing the signature block
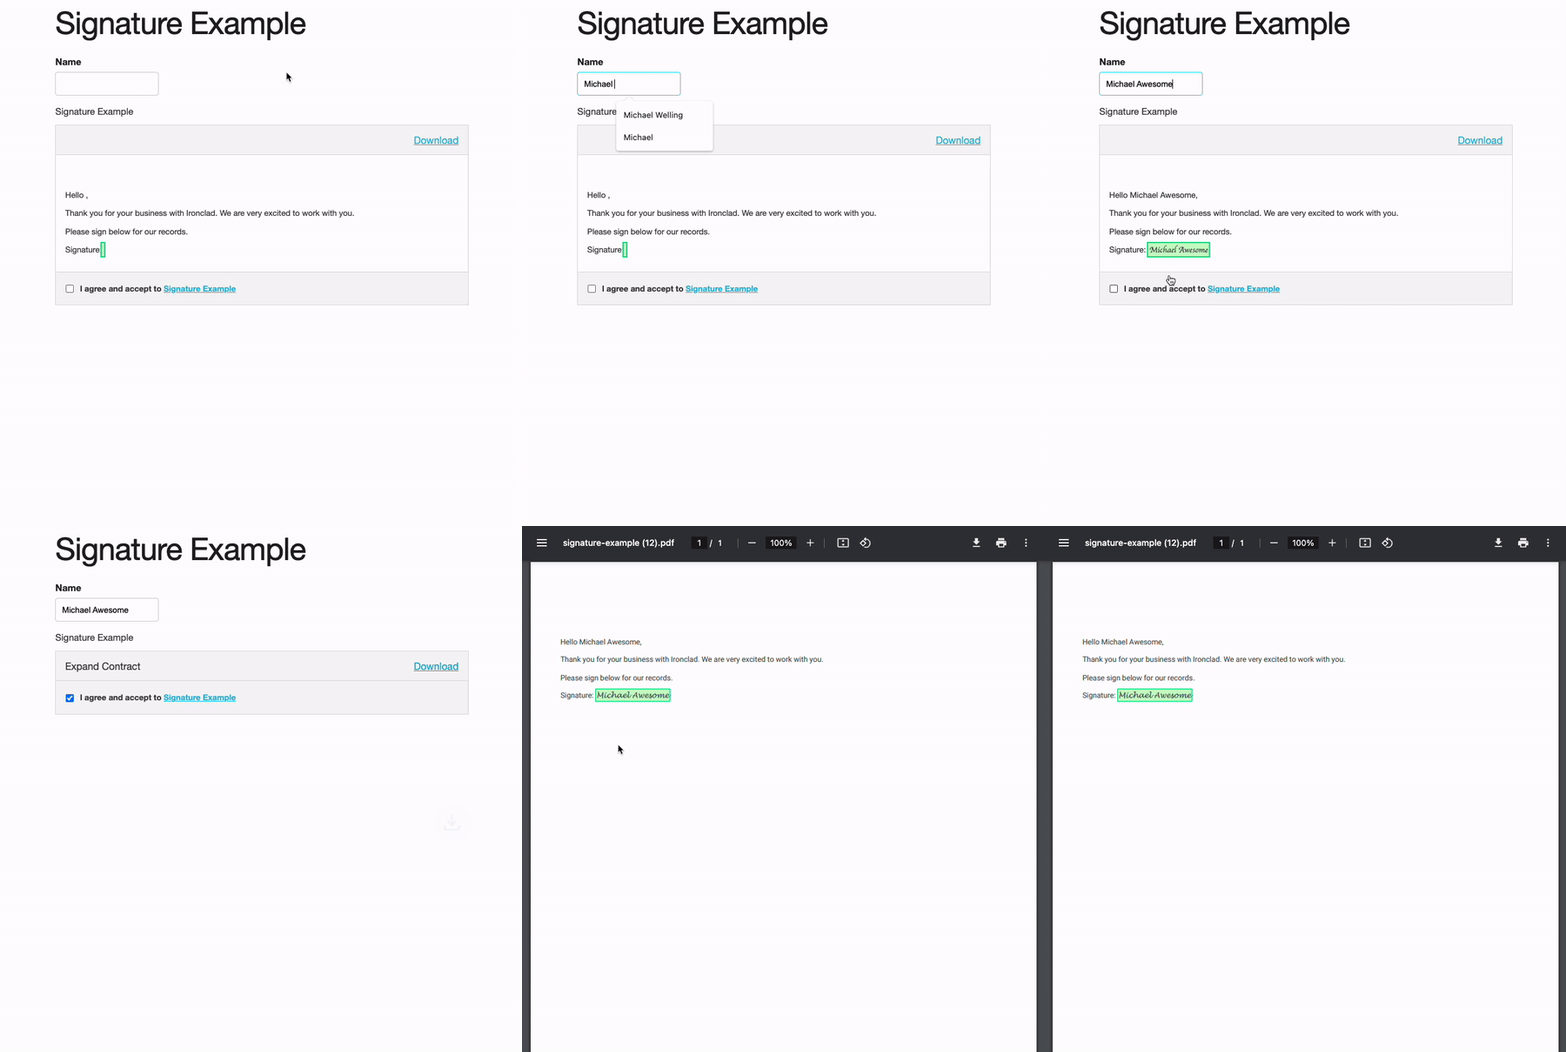
- On your browser, render
signature.html. - You should now see something like the following:

Updated 4 months ago
