Integrating Ironclad Clickwrap with Zapier
This article includes a reference to "Webhooks" in Ironclad Clickwrap.Webhooks are a feature of our Expanded and Enterprise Editions. To learn more about editions, visit our pricing page. To learn more about Webhooks, check out Getting Started with Webhooks .
Using Ironclad Clickwrap's Webhooks, you can easily connect to middleware systems like Zapier to make integration code-less and friendly to any business user.
When a contract for a new customer is signed, we here at Ironclad Clickwrap have one Zap that:
- uploads the PDF to Salesforce automatically.
- sends a Slack message to the Sales channel notifying everyone of the win.
- sends a Slack message to the rep to prompt them to update details in Salesforce.
- sets the Opportunity to Closed/Won.
In this article, we'll walk you through:
- how to get your Webhook set up to call Zapier
- how to use information in your Contracts to update 3rd party systems
- example integrations to get you started
Create a new Zap to catch a Webhook
To get started on plugging Ironclad Clickwrap into any Zap you've got, just create a new Zap and use the App "Webhooks by Zapier". Then use "Catch Hook" and follow the steps below:
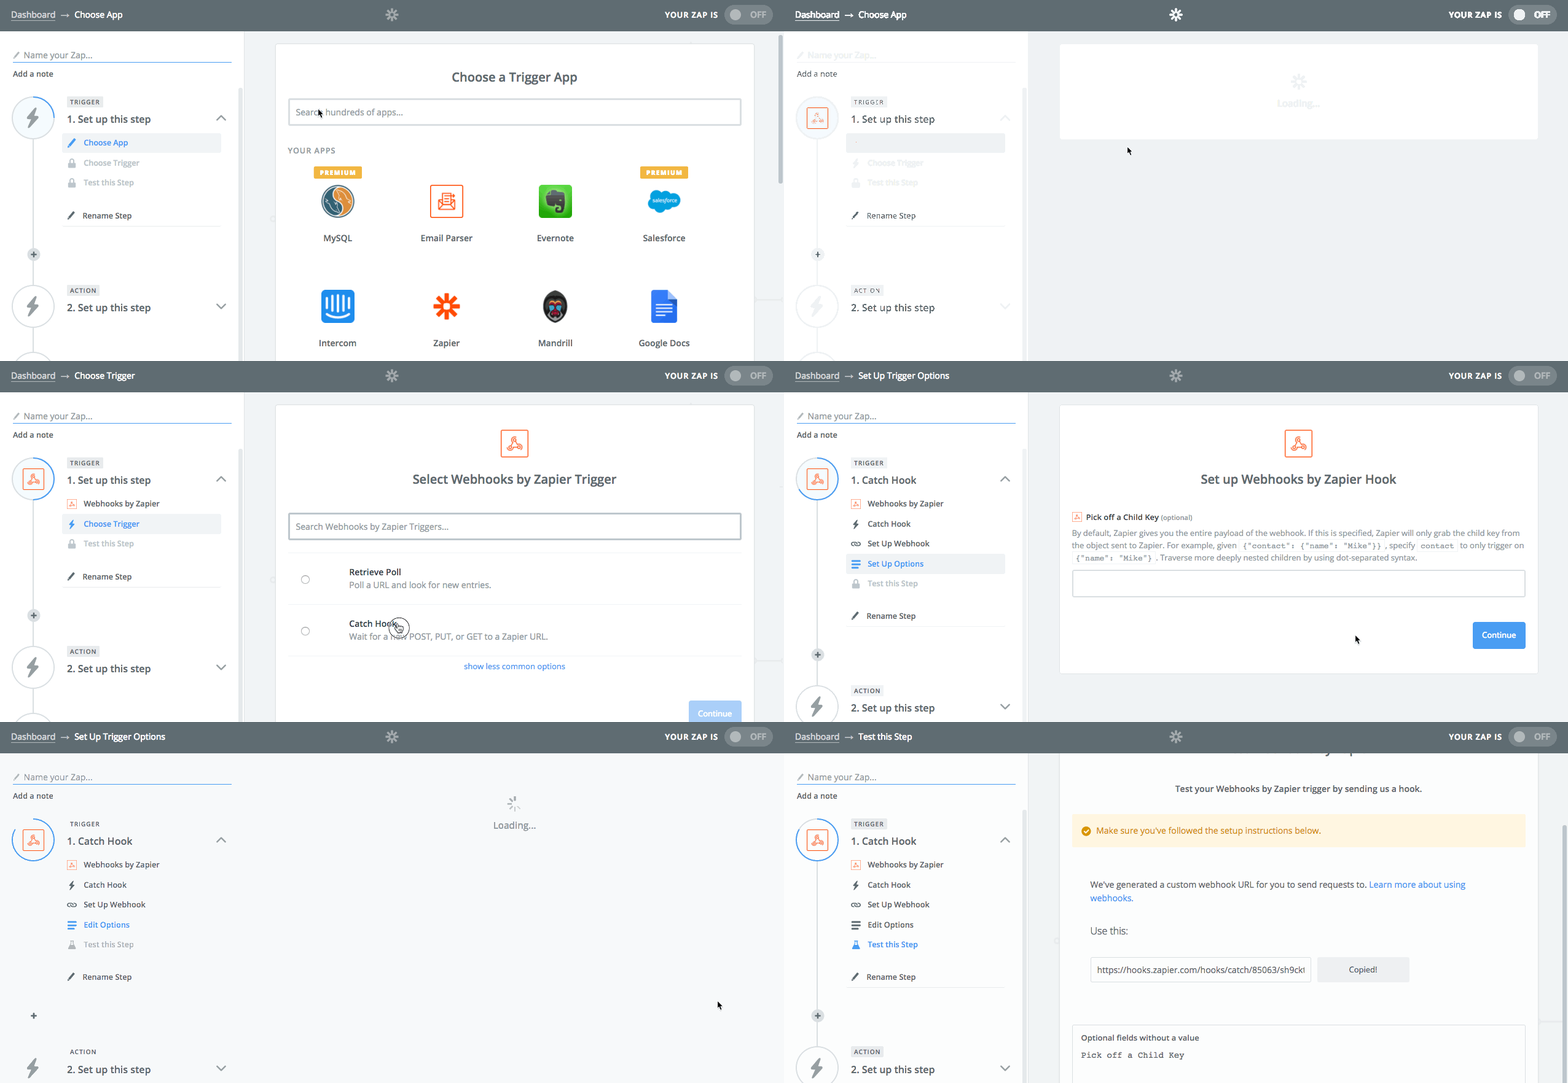
Setup your Zap in Zapier to get your Webhook URL
- Create a new Zap and select "Webhooks by Zapier" as your Trigger.
- Select "Catch Hook"
- Click "Continue" again (there's no child key)
- Copy the webhook URL to your clipboard!
Setting up your Webhook
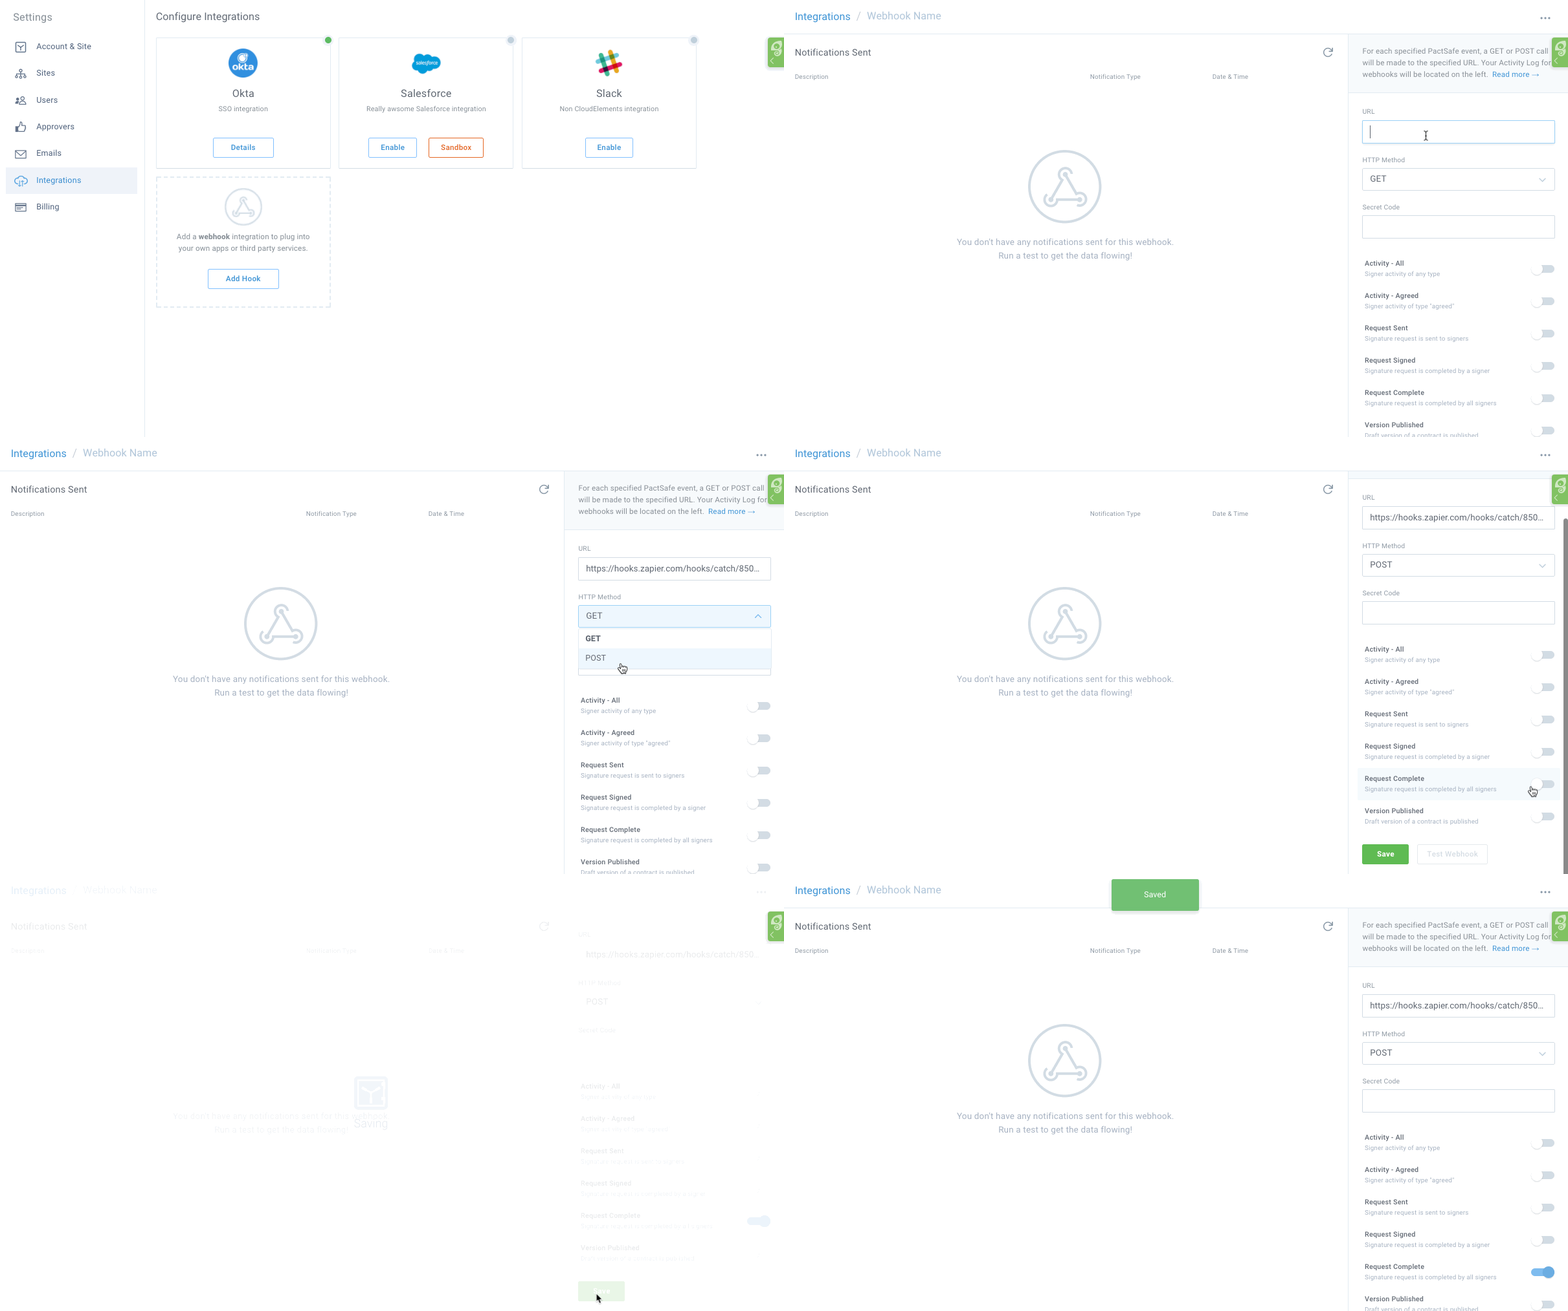
Now, you'll want to set up your Webhook in Ironclad Clickwrap to talk to Zapier. You can get to Webhooks in Ironclad Clickwrap by going to Settings > Integrations. For this example, we're going to set up a Webhooks for when any Signature Request iscomplete.
Click "Add Webhook" in Integrations and that will take you to your configuration screen where you'll paste in the URL you copied to your clipboard from Zapier. Be sure to use HTTP "POST" when setting up your webhook:
Send yourself a Test Request and Sign it
To test the Webhook with the data you want to pass from the Contract, you can create a new Signature Request in the Dashboard and select the Contract (or upload a new one) that has the tokens and fields you'd like to send to Zapier.
Using Tokens and Fields in a ContractWant to use data to drive the information inside of your contracts? Learn how to use fields and tokens on our unt`
In this example, we've got 4 Tokens and 3 Signer Fields in a contract.
The Tokens are:
Product_NameTotal_AmountPayment_TermsEffective_Date
The Signer Fields are:
- Billing Contact Name
- Billing Contact Email
- Payment Type (Credit Card or Invoice)
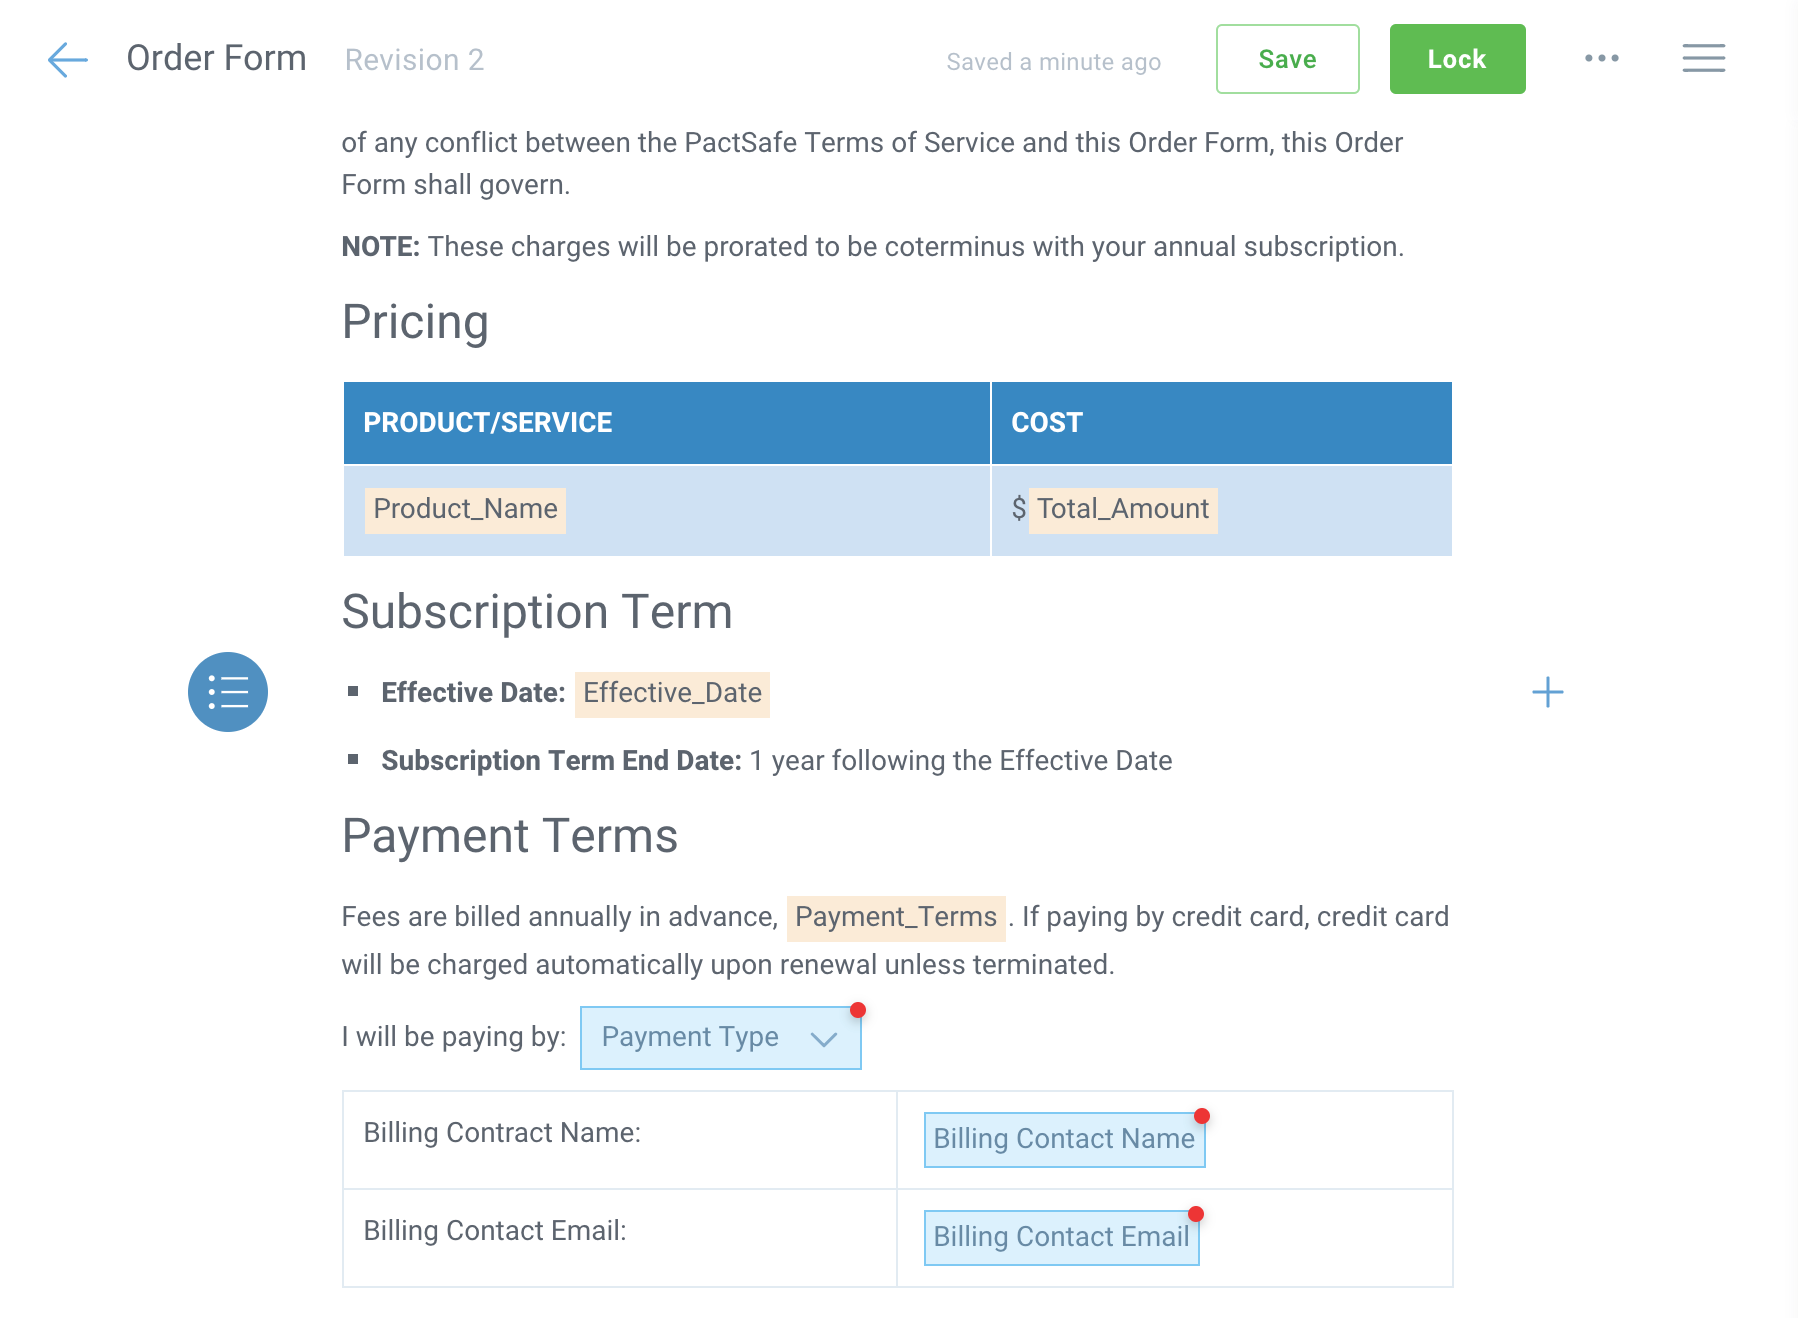
Next step is to send this Request to yourself. After sending, you'll be prompted to sign your own Request.
Not sure how to send a Contract through a Signature Request?Check out our knowledgebase for a quick overview:
Go back to Zapier once the contract is signed
After you've signed your own test request, you can go back to Zapier and click "OK, I did this" and you should see the green checkbox confirming the Webhook successfully triggered in Zapier:
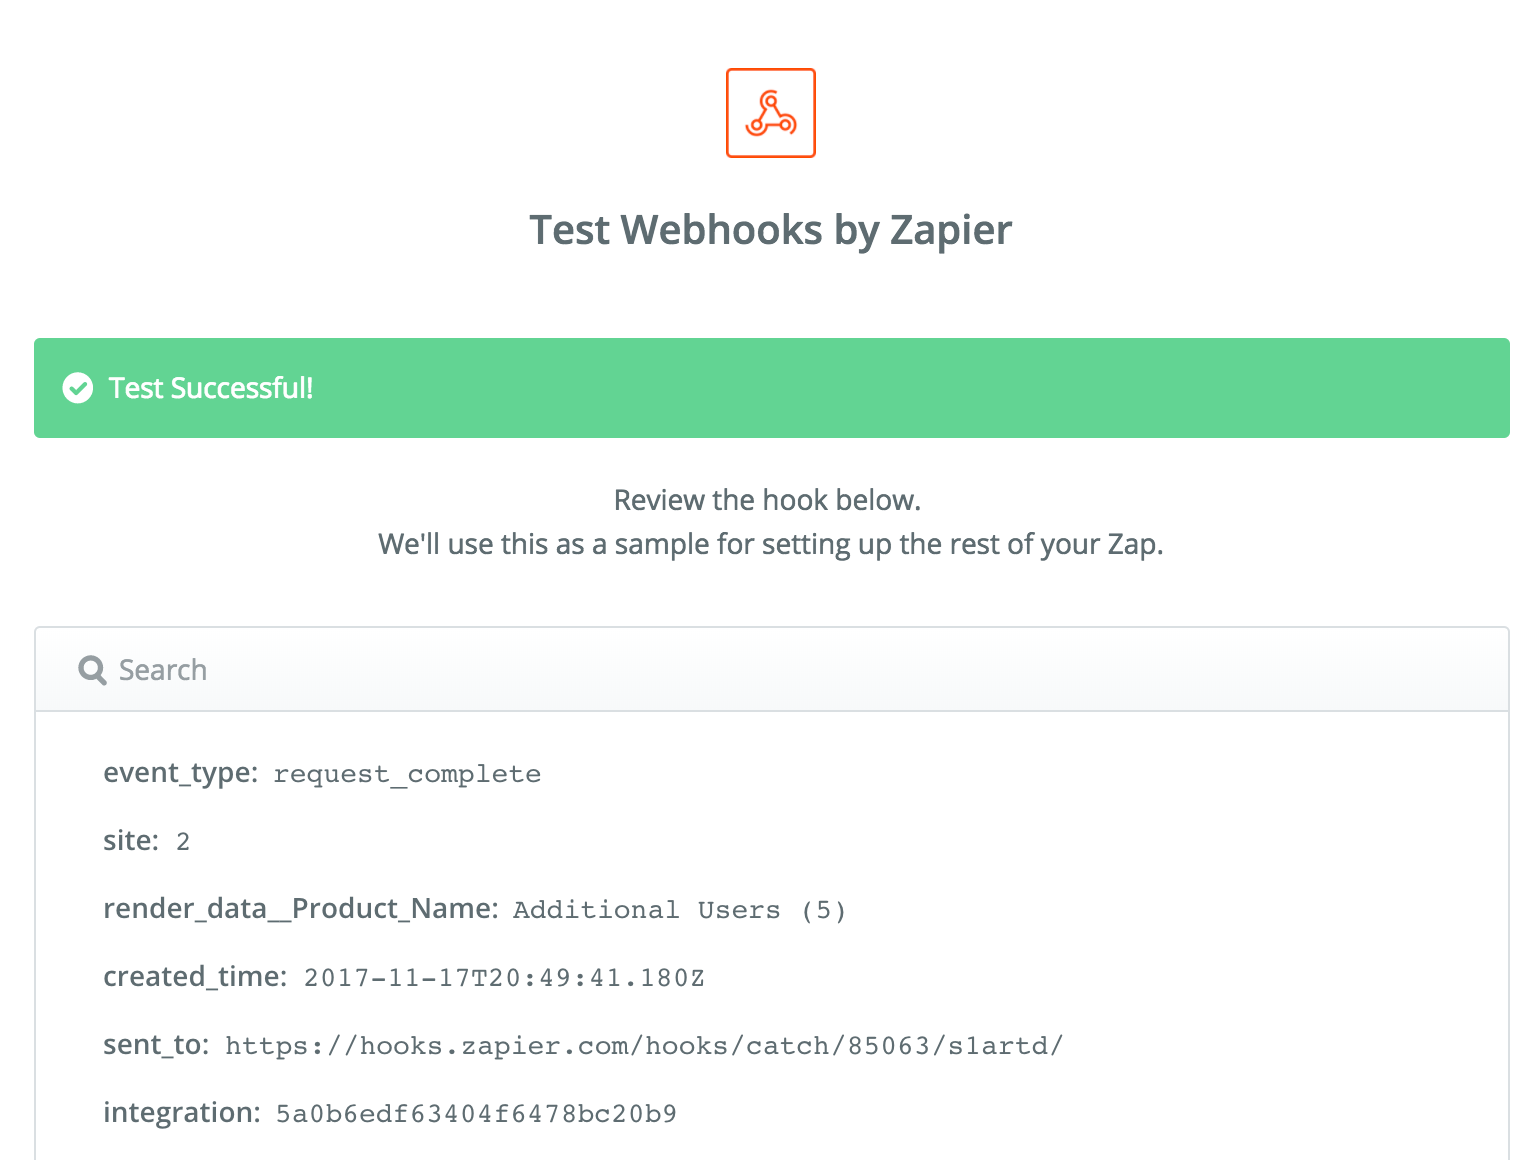
Now, those 7 Tokens + Fields are passed to Zapier as data that you can use to populate additional actions. For example, we can create a new customer in QuickBooks Online or update the Billing Contact Name and Email in Salesforce.
Updating fields in Salesforce
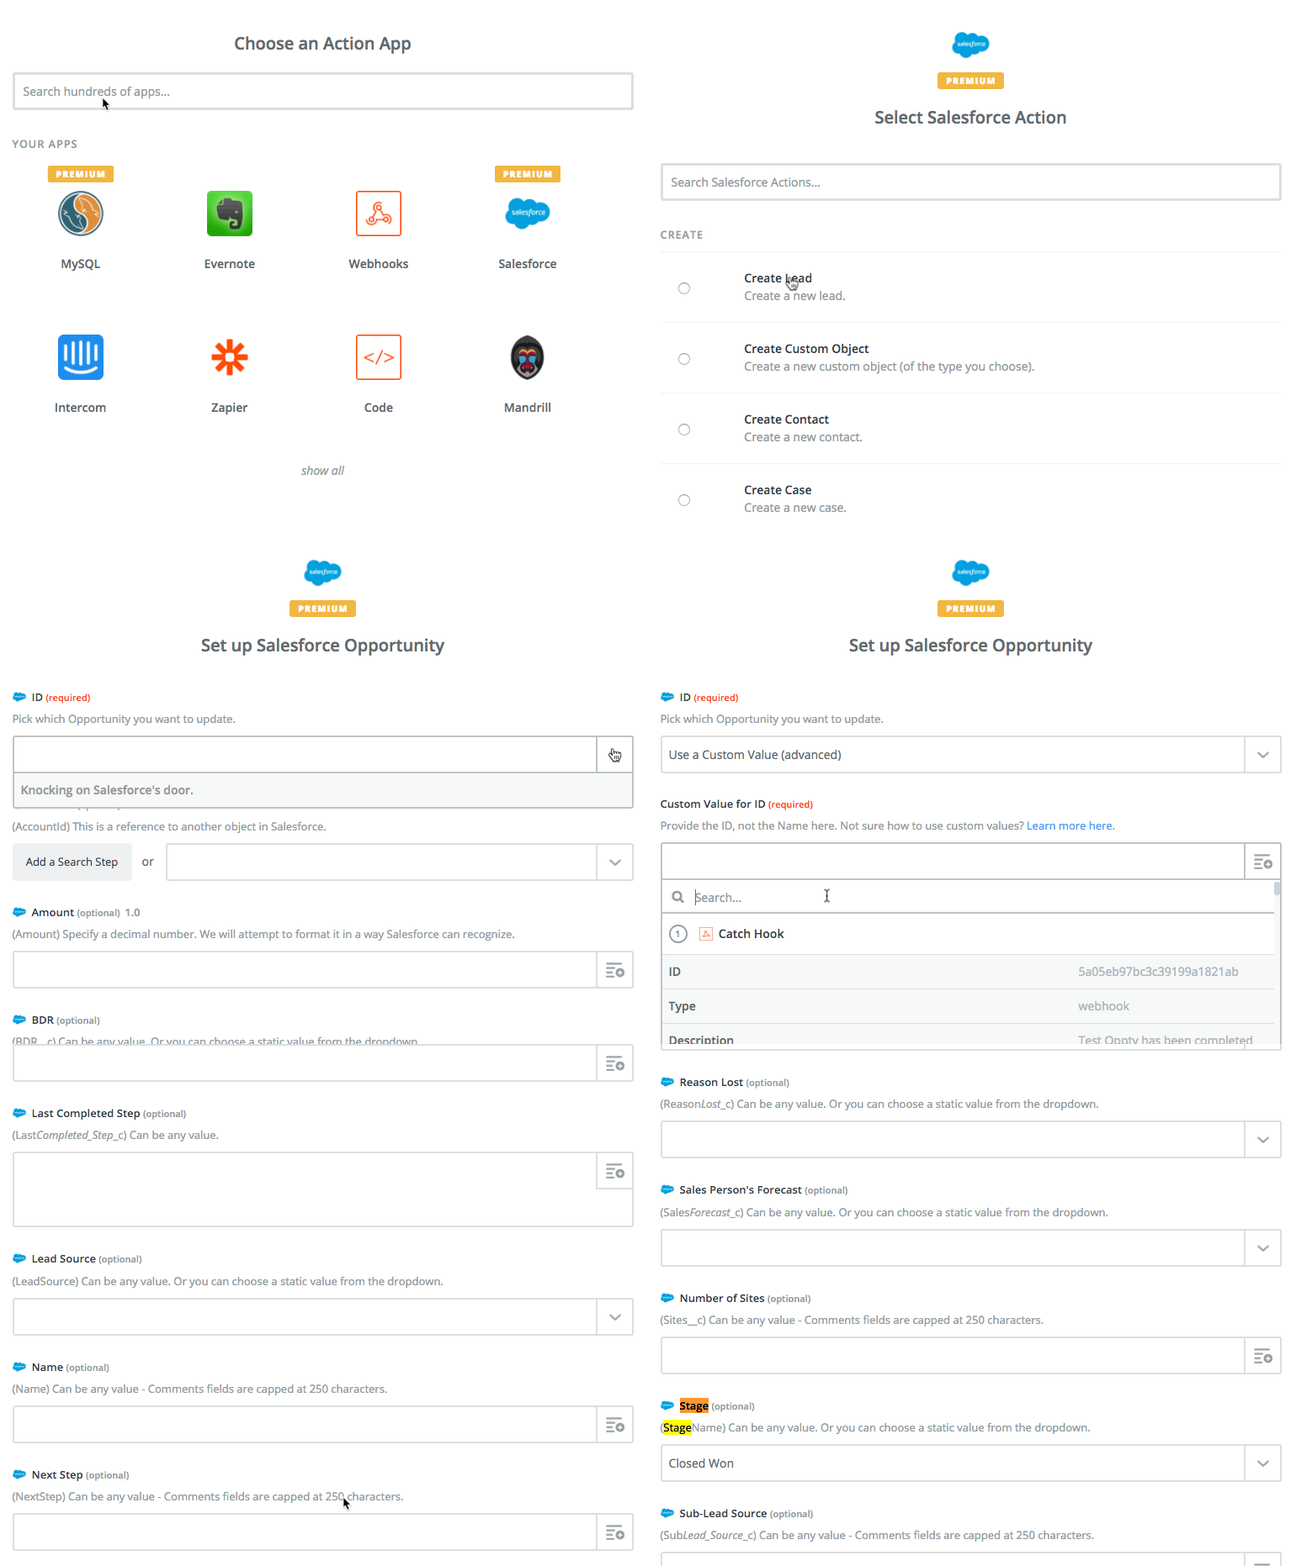
You can use contract fields or tokens to update Salesforce with important information like Billing Contact when a Contract is signed. Not only that, you can set the Stage of the Opportunity to Closed/Won using a simple mapping of fields from the Ironclad Clickwrap Webhook to Salesforce fields. Here's a quick example of how you can update the Stage of an Opportunity to Closed/Won when a Request is "complete" in Ironclad Clickwrap:
Sending a Slack message
You can also set up notifications in systems like Slack or HipChat that notify you when contracts are signed. Here's an example message template for sending when a signature request is complete in Ironclad Clickwrap:
Contract for {{render_data__Salesforce__account__Name}} sent by {{data__from_name}} has been signed!
Total Amount: {{render_data__Salesforce__Amount}}
Note: You'll need to update the fields above by mapping them from your Webhook in Ironclad Clickwrap. The above will result in a post to your #sales channel that might look like this:

Getting the PDF of a Request from Ironclad Clickwrap (Intermediate)
In order to get the PDF of the contract to send to, say Salesforce or Box, you'll need to do an additional action using the "Code by Zapier" app. Why? Because the webhook we send currently does not include the URL of a completed request. This is something we may add in the future, but as of yet there's a super simple workaround.
In Zapier, simply add the "Code by Zapier" app and follow these instructions:
- Add the app "Code by Zapier" to a step after your Webhook
- Select "Run JavaScript"
- Paste in the below code into the "Code" section:
fetch('https://api.pactsafe.com/v1.1/requests/' + inputData.request_id, { method: 'GET', headers: { "Content-type": "application/json", "Authorization": "Bearer " + inputData.access_token } })
    .then(function(res) {
        return res.json();
    }).then(function(json) {
        var output = json;
        callback(null, output);
    })
    .catch(callback);
You'll want to pass Request ID from your Webhook and your Access Token to the Request, so your final setup for this step should look like this:
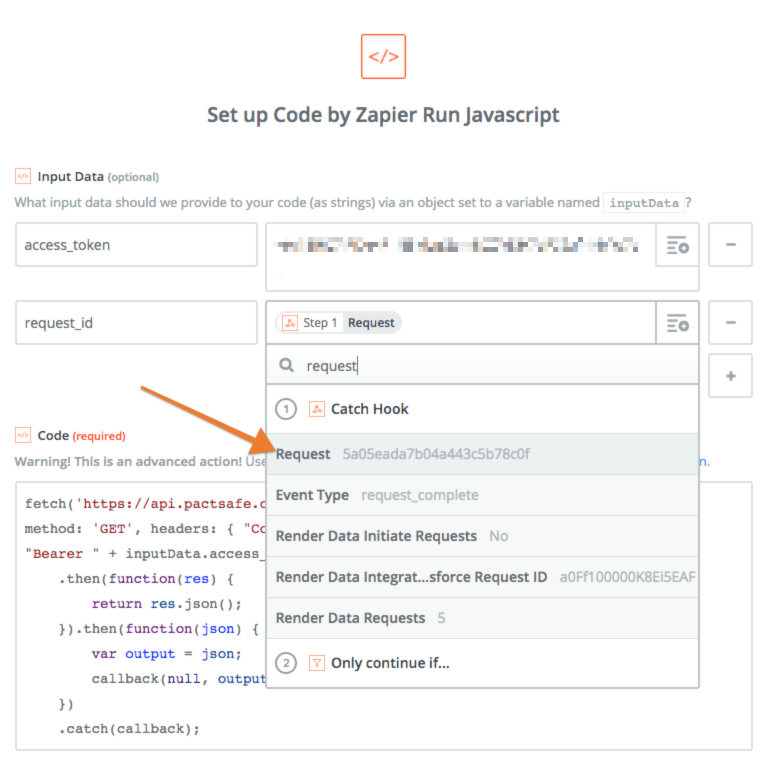
Use the Request ID from the webhook to populate the Request ID in the "Code by Zapier" action. That will give you a "Download URL" for your PDF that Zapier can use to send to whichever app you choose next!
Example: Sending the PDF to Salesforce
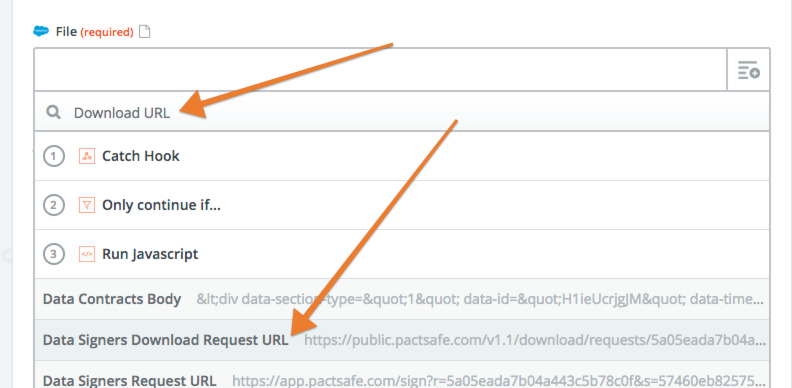
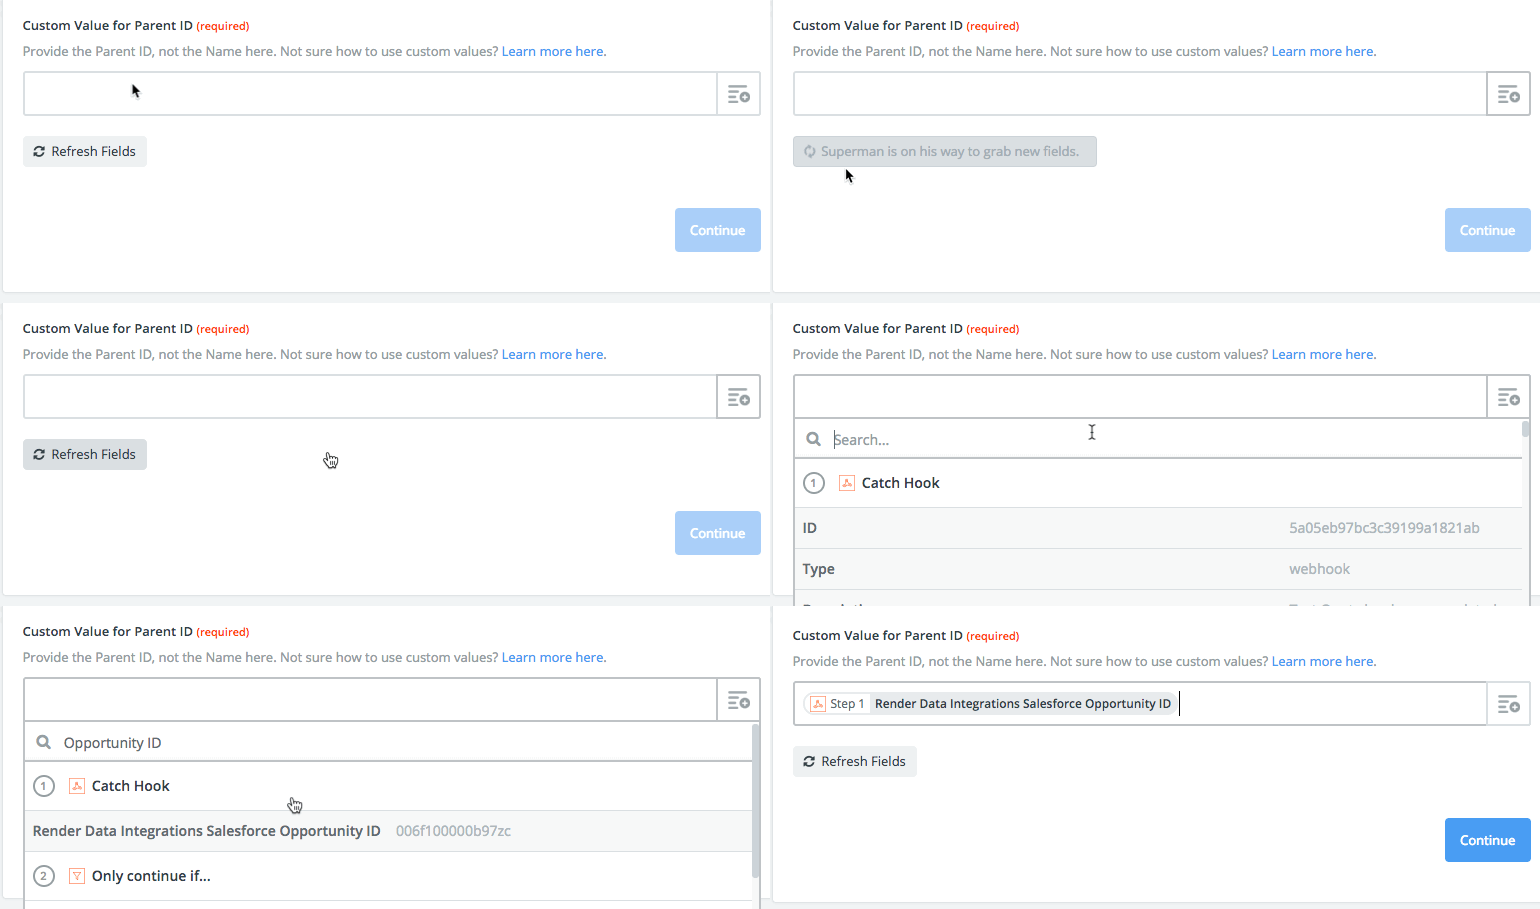
Next, create a Salesforce action using the "Create Attachment" action. You'll be able to map the "Custom Value for Parent ID" to the Object ID of what's populated in Ironclad Clickwrap—which, natively, supports Account ID, Opportunity ID, and/or Contact ID. You'll be able to do a search when mapping your "File" by doing a Search like so...
Then you can map your Opportunity ID using the following search:
Requirements for Salesforce integration like thisAdding PDFs to Salesforce requires passing an SFID into Ironclad Clickwrap (or uses our native Salesforce integration). In order to send PDFs back to Salesforce, you'll need to have our Salesforce integration setup or you can use
render_datato populate a Salesforce ID onto your Contract (that's a bit more advanced).
Testing your integration
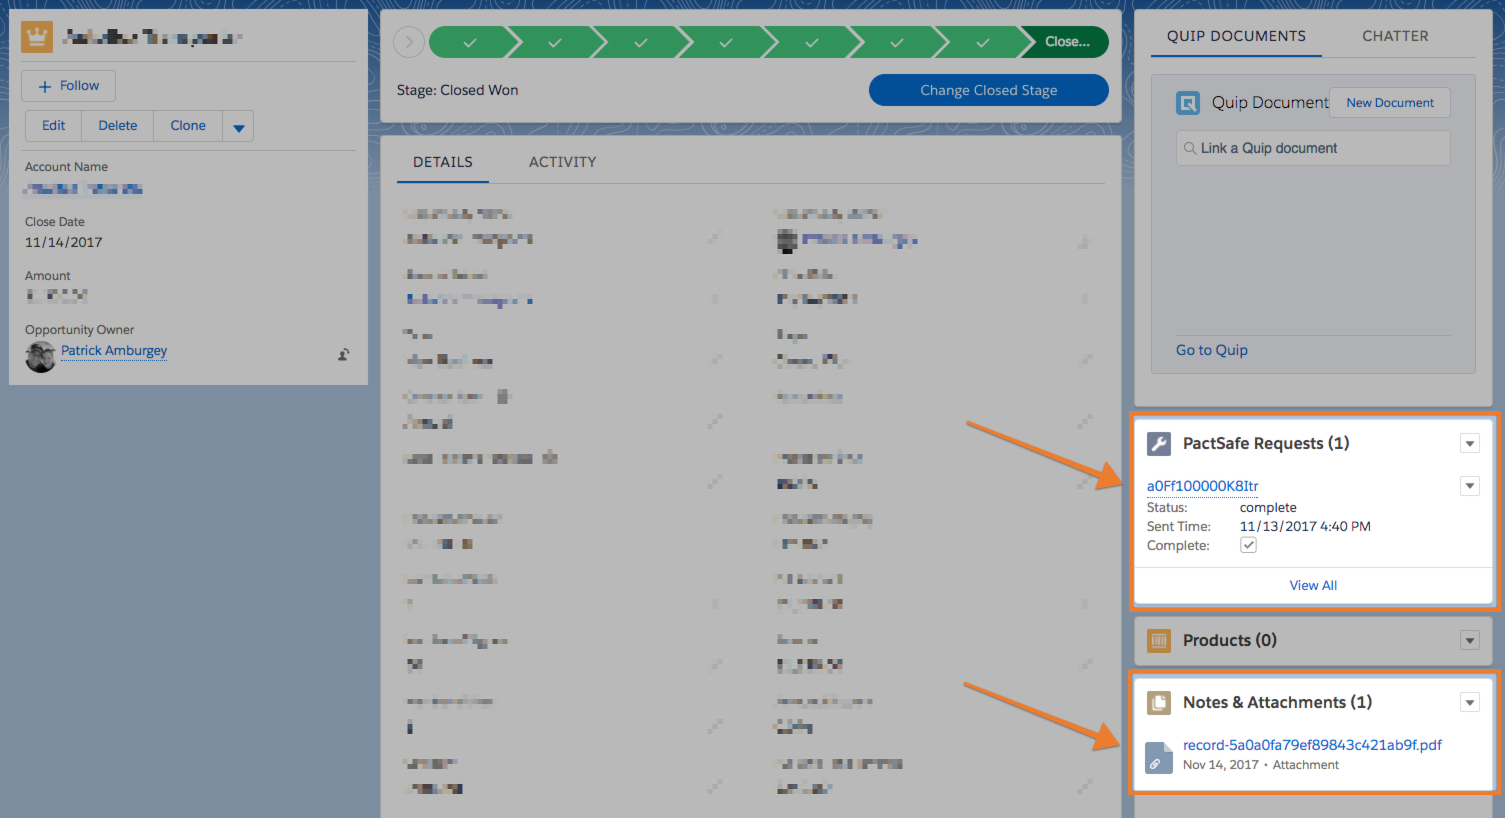
Once you're done setting the Zap up, you can test it by "Enabling" your Zap and sending yourself a test Request and signing it (see above!). Once you've tested your Zap, you should see the contract uploaded to your Opportunity, Account, or Contact:
Other Use Cases with Zapier
That's just one simple use case. Here are some other ways you can use Ironclad Clickwrap Webhooks to connect to other systems within your business:
- Update fields in an Opportunity (like setting Stage to Closed/Won or adding Billing Contact information from "fields" in a Request)
- Send a Slack notification with the Request name and other fields inside the Request
- Add a customer and invoice in QuickBooks Online after a contract is signed based on deal amount
- Send a message through Intercom to thank your customer for signing (Advanced)
Questions? Give us a shout at [email protected].
Updated 4 months ago
