Snapshots for Native Apps
This guide will cover setting up Snapshots for native apps.
Overview
Snapshots help you build a referenceable audit trail of screen designs (visual evidence) that can be included with records of acceptance. Snapshot automation allows you to automatically capture Snapshots of your native applications on devices with native screenshot capabilities using our API.
You can use Snapshot automation to capture any screen at any point in your user’s flow throughout your application using the following interaction:
- Determine if a Snapshot is needed. (GET call to Ironclad)
- If a Snapshot is needed, generate a screenshot using the end-user device’s native screenshot capabilities.
- Upload the screenshot to Ironclad using a pre-signed URL within 5 minutes of the initial request. (POST request)
Requirements
To get started, complete the following:
- Create and publish a Clickwrap group.
- Create and publish a Snapshot Location.
- Select "Native app" for location type.
- Select the frequency to either daily, weekly, or monthly
A unique snapshot location is required for each unique user interaction. Learn more here.
App Setup
Retrieve Snapshot Parameters to Determine if a Snapshot is Needed for a Snapshot Location
Perform a GET request to https://pactsafe.io/load/json?group_key=YOUR_GROUP_KEY&site_id=YOUR_SITE_ACCESS_ID&slo=YOUR_LOCATION_KEY
Don’t forget to replace “YOUR_LOCATION_KEY” with the Location Key of the published Snapshot Location.
Note the
snapshot_paramsobject. If a Snapshot needs to be taken for that location, it will be present in the response. If a Snapshot is not needed, this field will not be present. Whether or not a Snapshot is needed is determined by the location’s defined capture frequency and when the last Snapshot was captured.
As an example, here is the JSON data from a test group:
{
  "key":"...",
  "type":"...",
  "style":"...",
  "group":1,
  "container_selector":"",
  "signer_id_selector":"",
  "form_selector":"",
  "block_form_submission":true,
  "force_scroll":false,
  "alert_message":"...",
  "confirmation_email":false,
  "triggered":false,
  "legal_center_url":"...",
  "acceptance_language":"",
  "contract_data":{
    ...
  },
  "contracts":[
    1
  ],
  "versions":[
     "..."
  ],
  "major_versions":[
    "..."
  ],
  "snapshot_params":{
    "snapshotId":"...",
    "uploadParams":{
      "url":"http://aws-local:4566/local-ps-vault-native-uploads",
      "fields":{
        "key":"${filename}",
        "bucket":"s3-bucket-name",
        "X-Amz-Algorithm":"AWS4-HMAC-SHA256",
        "X-Amz-Credential":"AKI**********/20220811/us-east-1/s3/aws4_request",
        "X-Amz-Date":"20220811T183901Z",
        "Policy":"eyJleHBpcmF0aW9...",
        "X-Amz-Signature":"9eab7d2d94016fba1ad5c80e07ebba3ccfb60178"
      }
    },
    "filename":"1-location-nyixuip1a-62f514485301b402585ed87c-1660243150360"
  },
  "render_id":"...",
  "rendered_time":...,
  "auto_run":true,
  "display_all":true,
  "contract_html":"...",
  "locale":"en-us"
}Once the response API has been hit, these values are good for 5 minutes, anything uploaded after that will be discarded.
Perform a Screenshot Using Native APIs
Use the device’s native screenshot capabilities to take a screenshot of the end user’s device.
Create a Request to Upload a Snapshot
After taking a screenshot, you will create a POST request to upload the screenshot.
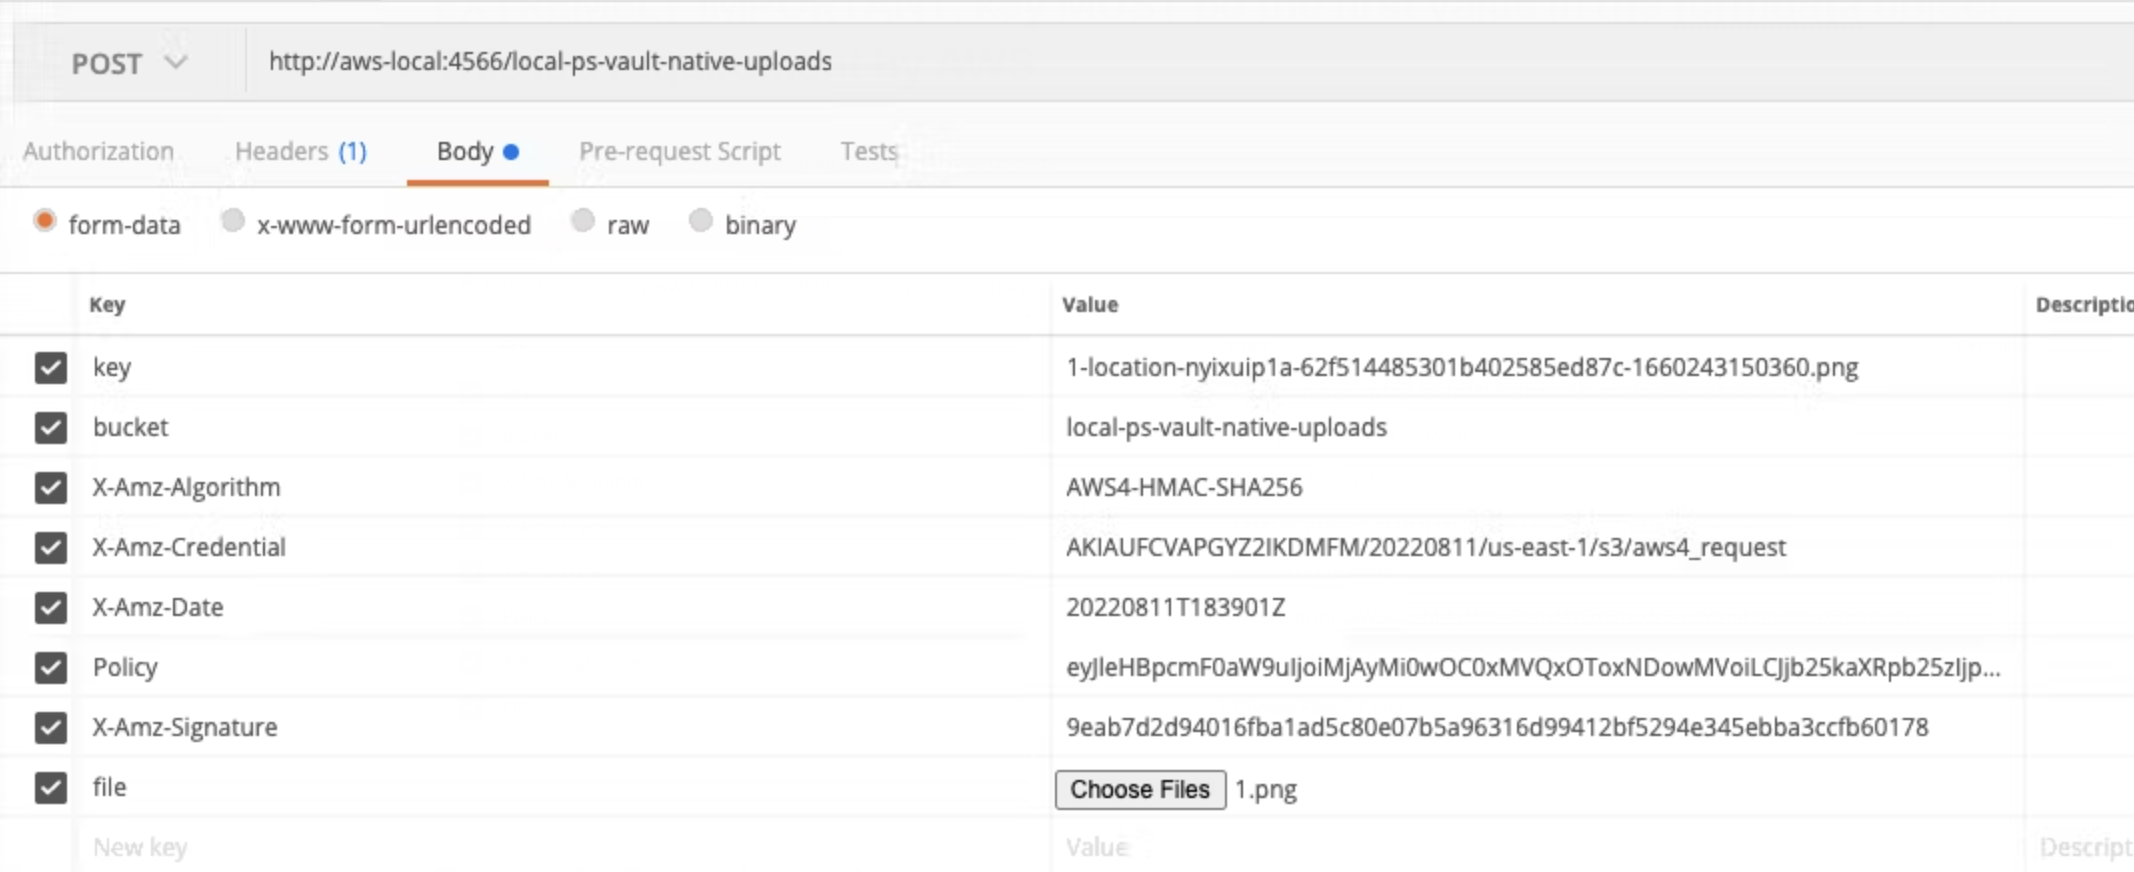
First, create a form-data POST request using the snapshot_params object.
Each field in the uploadParams.fields object must be a form-data field and be the exact value provided in the uploadParams object except the key. These act as a signature for AWS to validate the upload.
Second, construct the key object by taking the filename from uploadParams and adding your file extension.
The following is an example:
key: 1-location-nyixuip1a-62f514485301b402585ed87c-1660243150360.pngThird, snapshot_params.metadataFields will contain a list of metadata properties you must provide.
Construct the metadata fields by putting your metadata values into the form using the value of snapshot_params.metadataFields as the field name.
For example, if snapshot_params.metadataFields is { “device_model”: “Some-FieldName” } you will provide your device_model in the form using the field name Some-FieldName .
If you do not wish to provide some or all of the metadata fields listed, you must provide them in the form but with an empty string value.
The key must be the first value in the formdata object. This is a requirement by AWS.
Here is an example of the POST request:

Send the Request
Send the request AWS will return a 204 status code if successful. Any error you receive will be surfaced from AWS in XML format and look like the following:
<Error>
  <Code></Code>
  <Message></Message>
  <RequestId></RequestId>
  <HostId></HostId>
</Error>
In the event of an error, you may try to re-upload, or ignore the error and attempt to upload a screenshot with the next user to encounter the page.
Once the upload is complete, the snapshot will be uploaded to Ironclad Clickwrap Location. If the Snapshot location key is included in the record of acceptance, the corresponding Snapshot will be automatically included.
Updated 5 months ago
